Tuesday, March 29, 2011

Disney's Epcot's Flower & Garden Festival 2011

Living just 20 minutes away from Disney, you could imagine I have been to the parks a million times. Surprisingly I have never been to Epcot for the Flower and Garden Festival or the Food and Wine Festival which is later in the year. So I made sure to go this time and get ideas for my own garden.

As you walk around Epcot you come across various topiaries of famous Disney characters that are really cool to look at and figure out how they are made.
 Micky & Minnie Mouse

 Aladin

 Beauty & the Beast

 Cinderella & Prince Charming

 Princess Aurora & Prince Philip

 Peter Pan, Captain Hook, and Tick-tock the Crocodile.

 Snow White

Lady & the Tramp

And there were a whole bunch more that I missed some how....

I really enjoyed looking at their potted flower arrangements since that is what I do with my garden. I like how full the pots look, which I think was achieved with all the different pot heights, and of course an abundance of flowers. Unfortunately they are all basically annuals...
 It was a beautiful day.


 These were my favorite pot arrangements.
Lastly, I saw this wooden tower with various slots filled with dirt used in the vegetable garden located in the U.S.A. section of the park. I wish I could figure out how to make one because it saves on garden space. It was probably 5 foot tall.

Spinach Artichoke Dip, Food Wishes Style

So I love this blog called Food Wishes, and I finally made one of the recipes. As mentioned before, I buy all my food at Aldi so this was quite a challenge because they sell basic items so I had to change a few things.

Ingredients:
1 can of spinach $0.59
2 jars of artichoke hearts in water $2.29 each, I only used 1 and a half of the artichokes in these jars. The rest I am saving for a chicken Alfredo recipe I am doing later this week = $3.44 worth used in this recipe.
1 bag of shredded mozzarella $2.99, I used only 1 cup of this.
1/2 cups of grated Parmesan cheese $2.29. I bought a whole new plastic jar of Parmesan cheese, which the rest will also be used in the chicken alfredo.
10 oz packet of cream cheese $1.29
1/4 cup chopped red onion- had in my fridge all ready
1/4 cup chopped green onion - free from my garden
2 tbs butter
2 garlic cloves
salt and pepper
White Tortilla Chips $1.19

Total is approximately $ 9.50 to make this dip. Which is worth it because this recipe has lasted me a few days. Like I said, I had to make my own changes but the dip still tasted fantastic. Also the dip is not made with tons of mayonnaise or sour cream so it is healthier.

I started by chopping all the red and green onions. Then I strained all the water out of the canned spinach and the artichokes.
Next, I added the butter, garlic, red onions, green onions, and a pinch of salt to a medium saucepan on medium heat. Stir the mixture until the onions are nice and soft for about 10 minutes. Then I added the spinach, artichokes, and creamed cheese to the saucepan. Put the heat down to low, which will help melt the cheeses and make it easier to mix everything.
Once the cream cheese is all mixed through, I added the mozzarella and the Parmesan cheeses. Add another pinch of salt and some pepper.
Once everything is incorporated, I transferred the dip to a baking dish and topped it off with another 1/2 cup of mozzarella cheese.
I put the dip into the oven at 400 degrees and let all the mozzarella cheese melt, approximately 15-20 minutes. To make it extra special, I then turned  my broiler on and let the cheese crisp up for about 1-2 minutes.
I served mine with tortilla chips.
Enjoy!

Friday, March 25, 2011

Peacock themed decor anyone?

I love peacock colors, so I decided to redo my living room with a peacock theme. My wedding was also peacock themed, and so is my Christmas tree collection I got from Michaels craft store.... yea I really love peacocks. I'm attracted to those colors. As a photographer colors really impact me. What I have so far is a dark brown leather sectional and a entertainment center that is an espresso color I got from IKEA. below are actual photos of these things:
I have this entertainment center I got from Ikea. Except no TV in the middle so there is a huge blank space there and I have no idea what to put in there. Right now all the cubes are filled with books, DVDs, and games.
This is the sectional I will be getting in like 2 months from Ashley Furniture. I just placed it in layaway.

So what I ask is that if anyone finds some really cool peacock themed items that I could use for my living room let me know. You can even design a living room for me. I would love the color palate to be teal, greens, and brown. When it is all finished I will post a photo and mention who gave me the idea.


*The furniture photos shown are not mine, I got them from the Ikea and Ashley Furniture websites. I do not claim them as my own.*

Simple Gardening

I used to be really big into gardening, until I got tired of pulling up weeds. I decided to give it another try by converting everything into pots. So now its a potted garden. I'm even growing sunflowers in a huge pot to see how that goes. All the flowers/blubs/seeds I picked are for making flower bouquets. So I have roses, sunflowers, dahlias, Asiatic lilies, and giant zinnias to name a few. These plants usually require a lot of space so to save money on pots I was creative and bought things that could be used as a pot. Typically a huge pot runs about $25 and up, but at Wal-mart I stumbled upon some large plastic laundry baskets that were $5.
The Asiatic lilies are the trickiest thing for me. I never have luck growing lilies or orchids. I live in Florida so our climate can be too hot to properly grow them. Anyways, I will photograph the progress.
The Asiatic lilies have all ready sprouted. I bought a bag of 5 bulbs from my local Aldi's for about $3.

I tried a windowsill herb garden and it actually worked better than I thought. I have onions, lemon thyme, basil, and cilantro growing. I thought they would not get enough sun light but they are doing very well. I used some of the basil in the pizza I made in another post. I grew them from seeds so the cilantro and basil are about "2 months old" now. Fresh herbs are worth the wait.

I never buy actual annual plants. It is a rip off since they die in a few months to a year after they finish blooming or winter comes along. Any annuals I want, I grow from seed. They are very easy to grow from seed and you will have much more plants. I only buy perennials like my roses.

Tip: To keep your annuals lasting longer cut off the blooms as they start to die. An annual plant dies after it is fertilized and produces seeds. So if you keep cutting off the flowers when they start to fade/die, you keep the plant blooming longer. Since I live in Florida I start growing my seeds in February/March and I have blooming annuals all the way until about October if I keep doing this. Then I let them go to seed so I have bags and bags full of seeds for next year. If I have an abundance of seed maybe I will give some out for free? Just remind me in October if your interested.

What is a Quinceanera?

I'm a professional wedding and quinceanera/sweet sixteen photographer. I absolutely love photographing a quinceanera/sweet sixteen event. I get this question all the time: What is a quinceanera and why is it still celebrated?

There are various forms of what is essentially a "coming out party". This was a common cultural practice in the Victorian times. Back then a girl was considered a women at a much earlier age (15  or 16) and their family would host a coming out party to present her to the community as a grown women. It symbolizes a girl taking on the responsibilities of a women. Usually there was also a religious ceremony where the girl would be blessed by her local church.

For the Spanish and Latin American culture it is called a quinceanera.
For American culture it is most commonly known as a sweet sixteen.
Also many Indian, and Caribbean or South American Indian descent (Trinidad and Guyana in particular), call it a sweet sixteen.

Why are these parties still held today? Tradition. Unfortunately it is a dying tradition that I strive to keep alive since I am of Latin American descent. The women in my Mother's family and their family before her kept with the tradition, and I plan to do the same. It is supposed to be a family celebration, a time of remembrance from when the quinceanera was born to the present, and a thanks to God for blessing the family with the child. I think MTV's show "Sweet Sixteen" has really ruined the outlook of what the real purpose of this type of celebration is supposed to be. It is not supposed to be a "look at me I am so cool", "I'm such a diva", or "I'm spoiled rotten", party.

Today I am actually photographing a quinceanera. I will post a few of the photos later.

In need of some expert Yorkie advice

I have 2 problems with 2 different yorkies:

Problem #1
Our summers are very hot here in Florida, so I took my male yorkie to get basically a buzz cut at my local groomer. This was like 1.5 years ago. Now he has trouble growing his hair back especially on his hind legs and back. I've researched this and talked to groomers and vets, they have seen this problem before but have no idea why it happens or how to fix it. I've started him on salmon oil for the past month and I've really noticed no improvement. Anyone else had this issue?

Problem #2
I bought my second yorkie at a pet shop. BAD IDEA! She was in no way potty trained and was used to just going in her little cage in the store. So as you can imagine crate training didn't work because she would go in her crate anyways. So I tried to feed her then take her outside about 5 minutes after. She does nothing outside, but as soon as I bring her inside she goes on the carpet. It is like she is attracted to the carpet. My other yorkie is perfectly trained outside and I take them both out together hoping she would learn the routine...nothing works. I'm running out of ideas.

Sunday, March 20, 2011

Eli

I own two Yorkshire terriers, a male called Eli, and a female called Mia. I love to talk about them and all things Yorkie. So here I introduce Eli, my very first dog.


He thinks he is so cool in his hoodie.

Pizza Dough: I just dough'nt get it

I have tried several recipes for pizza dough over the years with no success. Now I'm getting serious. I just planted a windowsill herb garden and I cant wait to use some fresh sweet basil on some homemade pizza. So I decided to test out various recipes until I got one that worked for me. Today was the first pizza dough test using a recipe from a cookbook called "The Complete Book of Italian Cooking" by Carla Capalbo.

Whole Wheat Pizza Dough
1.5 tbs dry active yeast
1 cup luke warm water
pinch of sugar
2 tbs olive oil
1 tsp salt
1 1/4 cup plain white flour
2 cups of whole wheat flour

I begin by mixing the yeast with a cup of luke warm water in a large mixing bowl. I add a pinch of sugar and watch as the mixture begins to foam. Let it sit for 10 minutes.
10 minutes later, you should notice a difference.
 Next I add the white flour and 1 cup of the whole wheat flour. I like to mix the initial sticky dough ball with a rubber spatula so as to not get dough stuck all over my fingers.
Use the other cup of whole wheat flour to knead the dough. Sprinkle it on a flat surface and knead the dough until all the whole wheat flour is used up. This takes about 8-10 minutes. Kneading the dough for 10 minutes might seem like a daunting task, unless you have a bread machine, but its worth it in the final baked product. Kneading helps build gluten which gives a baked pizza crust good texture. I do not have a bread machine so I did it by hand.
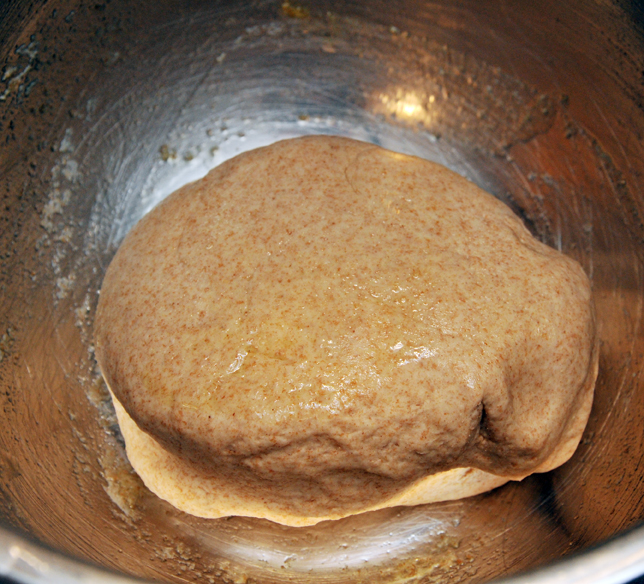
Once your done kneading, shape the dough into a ball and transfer it into a large oiled bowl. The dough needs plenty of space to rise. The dough will typically double in size. Let the dough rest in a warm spot for 50 minutes. Cover the bowl with a moistened towel to keep a crust from forming on the dough.
50 minutes later and the dough has risen. It is done if you touch it with your finger and the indention stays in tact.
Next I punched the dough back down and placed it on a floured surface for 5 more minutes of kneading. The dough is now ready to be used for a pizza. However, I planned to make the dough ahead of time to be used the next day. So I covered the bowl with a dampened towel and placed it in the fridge. Tomorrow I plan on using it to make a mozzarella cheese, Roma tomato, and sweet basil pizza. I'll post the results of the pizza crust obtained from following this recipe later.

Day 2
I took out the dough and let it rest at room temperature for about an hour. This helps to soften it up. I like a thin crispy crust so I cut the dough in half, and used half of it to bake my pizza. The other half I put back into the fridge after I covered it with a moist towel. I took out my rolling pin and rolled the dough very thin and spread it over a medium pizza pan.
I spread some tomato sauce made with pureed tomatoes and seasonings onto the crust followed by sliced Roma tomatoes, lots of mozzarella cheese, and basil. Then I drizzled olive oil over it.
Next, I placed it in the oven at 475 degrees for 10-15 minutes.
Looks great, and tastes OK. I was going for restaurant quality pizza and this missed the mark by just a bit. The pizza crust tasted more like a foccacia bread crust to me. Also, the tomato sauce did not have a "fresh" flavor, probably due to using canned pureed tomatoes. Next time I want to try making a dough without whole wheat and make my tomato sauce from scratch, possibly in a slow cooker?

Until Next time.

Strawberry Shortcake with a Shortcut

OK, so I dont use actual shortcake in this quick fix recipe, but it takes care of some miscellaneous items in my fridge and satisfies my sweet tooth at the same time. In my fridge I had some yellow cake, lots of strawberries, and vanilla yogurt, just waiting to be mixed together.
 All I had to do was take a slice of cake, dice it up in a small bowl and add diced strawberries.
Add some heaping spoonfuls of vanilla yogurt and you will find yourself in strawberry bliss. Not to mention its not such an unhealthy choice for a dessert if you go easy on the cake. For a richer experience try vanilla or chocolate pudding instead of the yogurt.
This is a quick fix dessert, but if you have more time and a trifle bowl try adding the ingredients in layers. Any type of cake such as pound or angel food cake will work great too. Personally, I prefer a cake that has no frosting because I try to use yogurt since it is healthier.

Homestyle Philly Cheese Steaks

Most of the food I buy is from a store called Aldi. I love their low prices and am able to stick to my $50 weekly food budget (for a household of 2). The following ingredients were used in this recipe:

2lb "Carne Picada" style steak. This is just thinly chopped up steak I buy from Aldi.
Couple tbs Extra Virgin Olive Oil
6 Hoagie Rolls
18 Slices of Provolone Cheese, mine were circular shaped and I cut them in half. I used 3 half cheese slices per hoagie roll so that they were extra cheesy.
1 Red Onion
1 Sweet Onion

Seasoning for Meat:
1.5 tsp garlic salt
1/4 tsp ground pepper
1 tsp Italian dried herb seasonin
1 tbs extra virgin olive oil

Olive Oil Spread for Hoagie Rolls:
4 tbs extra virgin olive oil
1/8 tsp garlic salt
1/4 tsp Italian seasoning


First I gather all the ingredients. Next I put the meat in a large bowl and add the seasoning for meat.


I covered the bowl and refrigerated the meat for 1 hour to let it marinade.
 When the hours up, I added the meat to my George Foreman grill after I sprayed it with nonstick cooking spray. It will take about 10-15 minutes for the meat to be done depending on how rare you like it. 15 minutes is well done. In the mean time I started slicing the onions. Once they were ready I put them in a small saucepan on medium heat. I mixed in about 1 tsp of extra virgin olive oil, a pinch of salt, and a pinch of ground pepper.
 By the time the meat is done the onions should be nice and soft.
The meat looks nice and brown so I turned off the grill and let it rest for at least 10 minutes. Now I started work on the hoagie rolls. I sliced the rolls open and laid them flat on a cookie sheet. I used the back of a spoon to spread the olive oil mixture I previously prepared on both sides of each roll. Next I set my oven to 325 degrees. I put the rolls in the oven for about 5 minutes so they could heat up. Then I added the half circle provolone cheese slices to the hoagie rolls and placed it back in the oven for another 5 minutes to melt the cheese.
 All that is left is to pile on the meat and onions.
Enjoy!